Tuesday, April 26, 2011

Knitting Yarns

Has been brought to our attention that not everyone can see and load our site due to the high graphics..... you need highspeed ! We will list our yarns here for all to see. To purchase any yarns just send us an email at: cottagecraftangora@hotmail.com  We will contact you via email and bill you with paypal.

I will number the yarns so its easier for knitters to order !
***The average shipping cost per package is $9.00 to $12.00.
*** please note, yarns are in either skeins or balls....depends what we have in stock at the time of ordering

 Yarn number 1 :
Yarn number 1:
100% qiviut, available in a 2 ply lace, 22 gram skein - 160 yards or 3 ply as shown, 22 gram skein 100 yards. Color shown Navy, is also available in : Natural, cranberry red, strawberry red, Hunter green, Bright Bordeaux, Purple, Raven Black. $39.50 each.


Yarn Number 2:
100% Buffalo/Bison yarn. 2 or 3 ply, in natural chocolate brown as shown or raven black, navy blue.
 2 ply: 22 grams - 155 yards. $22.00 each
3 ply: 22 grams - 90 to100 yrds. $22.00 each
We also have this same yarn in a big 100 gram skein $90.00 each.


Yarn Number  3:
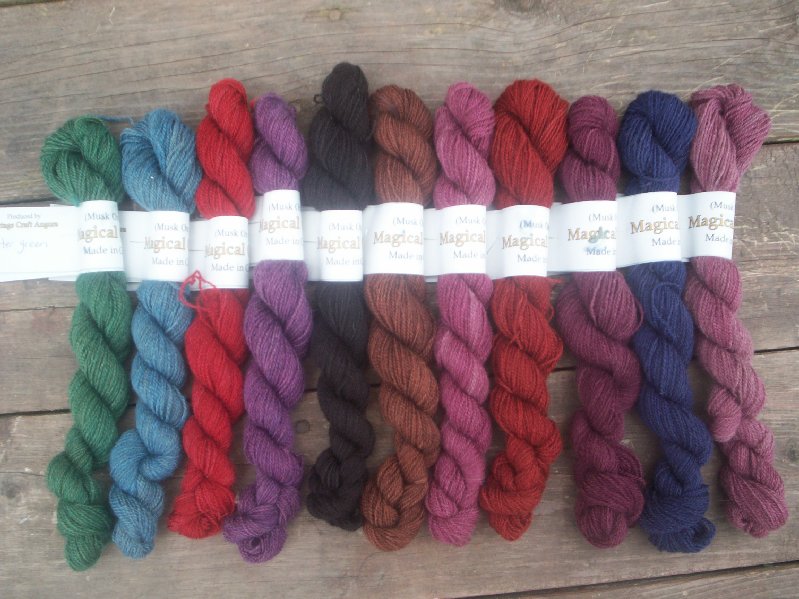
50% qiviut-50% merino. colors left to right: Hunter, blue slate, turkey red, purple, raven black, magogany, raspberry sorbet, egyptian red, bordeaux, navy blue, (the color on the end is no longer available)
22 gram skein - 160 yards, 2 ply lace, $15.00 each.

The same yarn above is also available in 50% Angora- 50% qiviut, $17.50 each.*** Please note colors are not exactly as shown as the different blends produce slightly different colors*** 


Soft Spun Angora is Back !
We first made this yarn in 2004. Due to our work load with the pure qiviut we had to give it a miss for a few years. Its back for good and will replace our 100% Angora until fall 2011. This easy knit yarn contains  80% Angora - 20% merino. 3 ply, like a sport weight, 50 gram skeins, 232 yards. 3.75 - 4.5mm needles ( for lacey projects use a 6 or 7.00 mm) Colors: (left to right) Raven Black, Turkey red, Bijoux Blue, Raspberry, Lavender, Wild rose. $15.00 each. More colours coming soon !  To see a Gorgeous sweater knit in this yarn check out this link:
www.canaryknits.blogspot.com/2008/03/le-lapin-noir.html


We will upload more yarns soon ! 

Thursday, April 21, 2011

Competition: win this smokering

Whatever you call it.....smokering, hood, snood.....its a very versatile garment that not only keeps you warm but adds a bit of glam ! You can wear it up over the head or pulled down around the neck like a scarf. Has an allover delicate lace design
We need a colour name for this yarn. The yarn is a new blend of 60% Qiviut-20% silk- 20% Bamboo. Lace weight 2 ply.
 Hand-painted in Egyptian red and Bright Bordeaux. The Silk and bamboo really make the colors Flash .....the qiviut adds wonderful softness and warmth.

The competition is open to everyone world wide.
To enter leave your color name suggestions in the comment section and we will choose our favorite name.
Name can be relevant to the actual colors you see in the yarn, flowers from Nature, names related to musk ox, qiviut, the Tundra etc !
Competition runs until 20 Th May 2011.
Best of Luck !

                                              Win this smoke ring
Date:21-05-2011
The winner of the smokering is 'Tamara'.....we thought the name ''Tundra Bearberry'' very fitting for this colorway. Congrats Tamara, please contact us by email with your mailing address !

Saturday, April 16, 2011

April competition winner..........

Winner drawn at random was '' Jennifer''...........please contact us at
cottagecraftangora@hotmail.com so we can ship you your yarns !

Thanks to all who took part !

Our next competition is a ''Name it'' competition. We have a new hand knit smokering design we are working on and need help with the name....be sure to enter ! Details wil be posted soon.

Wednesday, April 6, 2011

qiviut sweaters

Just finished yet another 100% qiviut sweater....this one is sold and now on its way to its new home in Vancouver. I decided to knit this one with rolled edges to get that beautiful qiviut drape going. All edges are double cast off so there's no chance of stitches unraveling. Knit in fine 2 ply its just so yummy and soft as a cloud with that distinctive qiviut halo ! Qiviut is 8 times warmer than sheep wool and is so light and airy the knitwear is very comfortable to wear next to the skin. Available in Adult Sizes: small- $600.00, M-$640.00, L- $680.00, XL-$700.00, XXL-$740.00, XXXL- $770.00+ xpress shipping. Unisex design.

 The ladies sweater (not shown) comes with ( at no extra charge) a lace neck scarf attached to the sweater by way of knitted belt loops. I will post a picture of this when i get around to knitting it in a few days or so. The scarf drapes beautifully and there's no chance of loosing the scarf as it fits snugly through the belt loops. To order a sweater or a custom knit design please contact me at http://www.cottagecraftangora.com/ for more information.

The 2nd sweater I'm working on above is knit with 80% Qiviut-20% super white merino. Knit with 3 strands together = 6 ply on 5.00mm circular needle. I knit the bottom 3'' inches on a 4mm to make the edge stitches firm. Its very Thick and I'm sure it will be very warm. This design is an irregular rib and i think its just what this heavy sweater needs......the rib construction and the merino content will help it keep its shape and drape !
Not sure how much yarn this sucker will take....i dare not count.  I have balled  352 grams, the back and front so far measures 8'' and i need to go to at least 15'' inches up to the armholes. This baby is already sold and when finished will be on its way to Idaho. The customer bought this to keep him warm while riding his horse.

Will post more as the sweater progresses so check back Jim to see your sweater come to life !
So far so good......divided St's for back and front and I'm very happy with the yardage its better than i thought ! The sleeves are set in style and I'm DEC the St's at both ends for the arm hole shaping. The rose wood needles are very smooth (though not as smooth as the Addi turbos http://www.espacetricot.com/
 i knit English style so the knitting is Flying now.....cant wait for it to be done so i can stand back and look at my work, this sweater is gorgeous and I'm sure i will be making many more of this design !


Voila.....complete except for i want to add a hood. I think the hood should be knit in regular plain stitch as this will highlight the overall design of this sweater. One of the great things about an overall rib design is that it really holds its shape well, has gorgeous drape and elasticity to every inch. The sweater looks small but it magically grows on you the moment you get it on ! The rib design feels so comfortable to wear and makes a person look taller and slimmer. Will post the final picture after i add the hood later today.....wish this was mine, Winter is back. Were having Snow and wind again today 'soooo lucky i don't have to travel to work'


So we can say .......its complete. This sweater is sold and now on its way to Jim. To buy this sweater design contact me at the email address above with your size and color choice. Price $1,800.00

HOOD FAIL.........well i tried 3 different hood styles and didn't like any of them on this sweater and i suddenly realised why ? The hood should be all one with the sweater......a continuation of the neck line. For sure next time i knit this i  will suggest to the customer that we add a hood.

The Hat That was A Hood.......all is not lost. I had this rectangle left over.
10'' X 20'' so i turned it into a thick warm hat for hubby.
I stitched closed the seam along the short edge and turned up the brim section sewing it closed and along the length ways edge i gathered the top section on 4 strands of yarn so it would be strong enough to hold up to whatever he puts it through !
 The stitch pattern is: 5mm needles cast on 66 sts * k3, p3, k1, p2, k2, p3, k4, p4, rep from * to end. Row 2: k the k sts and p the p sts.
  30 minutes after this picture was taken he calls me from his Pied (foot) Dr's office and says ''er can i sell this hat''......the Doc wants it.......lets just say I'm not making another hat for him....the butcher might ask for the next one !

Sunday, March 13, 2011

Qiviut/Merino Cabled Socks...in Bordeaux : March Competition

The Clear winner of last months competition is the Egyptian red and why not ? Whats not to like about beautiful warm red with orangy undertones ! However, my fav is the bordeaux and much more suitable for me.
       Whats even better is knitting these socks with 50% Qiviut/50% merino yarn. The qiviut adds warmth, a luxurious feel...... sensuality to the yarn.....a feeling of gorgeousness and softness. The Merino adds strength,  durability and some elasticity along with supleness and adds balance to the yarn. Qiviut/merino wool blend makes the perfect socks.....that are soft and warm.
Overall Design: cabled sock top, smooth leg and foot section and toes.....for the longest time i have wanted hand knit socks with toes so every toe is snuggly wrapped in comfort ! (if you are not comfortable knitting toes.....thats ok, just knit a plain toe section)

The Competition: Win the yarn to make these socks.

*****By entering this competition you agree to use this yarn (if you are the winner) to knit the sock pattern below (socks with or without toes) and by entering you agree to send us by email a picture of the actual socks for us to post on this blog !*****
The winner will be drawn at random. Open to knitters world wide.
Tell us in the comment section what your color preference would be, either Bordeaux or Egyptian Red !
Competition is open until 15Th April 2011.
                                 Best of Luck knitting buds !

To knit these socks You will need :
1 pair of 3.5mm straight needles.
1 set of 3.00mm D.P.N
1 set of 2.75mm D.P.N
1 st marker.
1 cable needle.
Wool needle
4 skeins of qiviut/merino yarn.

TENSION: over cabled section: 16 rows= 2.5''  X 30 sts= 4.5'' inches
Tension over plain/knit st 8sts= 1'' inch X 10 rows = 1'' inch

The cabled leg section of sock is knit on straight needles. Begin by casting on 30 sts with 2 strands of yarn together. Knit across 30 sts, then begin cable work below.
1: p5, c4B, (p4, c4B) twice, p5.
2:  k5, p4, (k4,p4) twice, k5.
3: p4, T3B, (T4F, T4B) Twice, T3F, p4.
4: k4, p2, k3, p4, k4, p4, k3, p2, k4.
5: p3, T3B, p3, C4F, p4, C4F, p3, T3F, p3.
6: k3, p2, k4, (p4, k4) twice, p2, k3.
7: p3, k2, p3, T3B, T4F, T4B, T3F, p3, k2, p3.
8: k3, (p2,k3) twice, p4, (k3,p2) twice, k3.
9: p3, (k2,p3) twice, C4B, (p3,k2) twice, p3.
10: k3, (p2,k3) twice, p4, (k3, p2) twice, k3.
11: p3, k2, p3, T3F, T4B, T4F, T3B, p3, k2, p3.
12:  As 6Th row.
13: p3, T3F, p3, C4F, p4, C4F, p3, T3B, p3.
14: As 4th row.
15: p4, T3F, (T4B, T4F) twice, T3B, p4.
15: As 2nd row.
Rep above pattern 3 more times. Next bind/cast off all 30 sts.

                                                    Make sock:
With wrong side of work facing you, pick up and knit 54sts along the Longest edge onto a 3.00mm D.P.N. Next, with right side of work facing you, knit across the 54sts and put 18 sts each onto 3 dpn's.
                                                                 OR:
For a seam at the back of socks : Stitch the cast on, cast off edges together to form a rnd, with the seam facing to the center back, pick up and knit 18 sts for 1 st needle and then rep all around for needles 2 and 3.
 Join to work in the rnd, k1, place marker and continue to knit around ( putting extra tension on the 1st  stitch of each needle to prevent a ladder forming ).
continue knitting in the rnd until work measures 8.5'' inches long from beg edge of cable design.

                                                     Heel Flap:
Knit across 14sts of 1 st needle. Slip the last 4 sts onto needle 2. On needle 2 we knit the heel flap.
K1, slip 1 all across needle and add 4 sts from needle 3 to needle 2 so you now have 26 sts on needle 2 for heel flap. Next row: Turn work and purl all sts. Continue to k1, slip 1 and purl rows until flap measures 3'' inches long.

                                              This picture taken outside shows the true color of Bordeaux and its not at all Dark as the picture at the top of page suggests !

                                               Turn Heel:
1: (WS) p14, p2tog, p1, turn work.
2: sl 1, k7, k2tog, k1, turn.
3: sl 1, p8, p2tog, p1, turn.
4: sl 1, k9, k2tog, k1, turn.
5: sl 1, p10, p2tog, p1, turn.
6: sl1, k11, k2tog, k1, turn.
7: sl1, p12, p2tog, p1,turn.
8: sl1, k11, k2tog, k to end.

                                               Make sock Gusset:
With (RS) work facing you and on needle 3, pick up 14 sts evenly along the heel edge. Continue knitting across needle 3. You now have 29 sts on needle 3. Rep for other side of gusset adding the sts to needle 1. Slip marker and knit 1 rnd.
dec shaping rnds; needles 1: k to last 3 sts, k2tog, k1.
                                           2: k without shaping.
                                           3: k1, k2tog, k to end.
Every 2nd rnd k without shaping. continue until you have  17 sts rem on needles 1 and 3. Next rnd: continue shaping as above for another 6 rnds and at the same time dec on needle 2 as thus: k1, k2tog, k to last 3 sts, k2tog, k1.
When finished you should have: 14 sts on needles 1 and 3 = (28), needle 2 has 12 sts.
 K for a further 6 rnds.

Foot shaping increases: on needle 1, k to last 2 sts, inc 1 st. needle 2- no increase. Needle 3, k1 inc 1 sts, k to end. Next rnd: knit without inc. rep these 2 rnds another 3 times until you have 18 sts on needles 1 and 3 and 12 sts on needle 2.
Continue knitting without shaping until sock reaches to beg of toes......try it on for correct fit !
                                               Knit the Toes:
''Right Foot''

 With 2.75mm d. p needles knit 2 rnds.( With  2.75mm the large toe sts will be smaller and firmer so they will be more durable) ! If your socks are anything like mine ' its always the large toe area thats goes first' !

After knitting the 2 rnds, slide 6 sts from needle 1 onto needle 2 and 6 sts from needle 3 onto needle 2. knit sts from needle 1 onto needle 3 removing stitch marker as you go. You now have 48sts divided onto 2 needles that are facing eachother. Next we divide for toes (DO NOT BREAK YARN)
It is very important to try on the sock as you knit so each toes is perfect !
I found that the toes were a little on the small side and would have been better if knitted on a 3.00mm needle !

With contrast thicker yarn and wool needle remove 16 sts to waste yarn. Rep for other needle. Divide the 16 sts remaining onto 3 needles and begin to knit around to make large toe. Knit with extra tension to keep sts firm and small = durable !
When knitting reaches just past the end of large toe, break yarn leaving a 10cm tail and close top of toe, secure sts and sew loose end inside if sock.

Next: the following toes are knit on 3.00mm D.P.N
Slip 4 sts from each side onto 2 d.p.n's, at same time pickup 1 extra st from both sides of the gap between toes so you now have 10 sts to knit 2nd toe. Leaving a 10cm tail to close gap between toes, join to work in the rnd and knit as before trying on the sock for fit.
Rep as above for the next 3 toes and then your done. Sew in any loose ends and begin other sock reversing the shapings for toes of other foot.......Knit 2nd sock as 1st until you reach the toe section, then follow the pattern below for Left foot.

Left Foot: you should have all your sts on 2.75mm d.p.n'S and are ready to divide for toes.
Needles 1 and 3. slip 6 sts each from the ends of these needles onto needle 2. This needle now contains 24 sts. knit the sts from needle 2 directly onto needle 1. You now have all sts on 2 parallel needles. to knit the large toe of left foot you must knit to the opposite end of needle 2. You are now ready to remove the extra sts to waste yarn as before and knit the large toe on the 2.75mm needles as before and remaining toes on 3.00mm needes.


ABBREVIATIONS:
T3F= put next 2 sts onto cable needle and hold at front of work, purl the next st from left hand needle, then knit the 2 sts from cable needle.
T3B= put next st onto cable needle and hold at back, knit next 2 sts from left hand needle, purl the st from the cable needle.
C4F= put next 2 sts onto cable needle and hold at front of work, knit next 2 sts from left hand needle, then knit 2 sts from cable needle.
C4B= put next 2 sts onto cable needle and hold at back, knit next 2 sts from left hand needle, knit the 2 sts from cable needle.
T4F= put next 2 sts onto cable needle and hold at front, purl next 2 sts on left hand needle, then knit the 2 sts from cable needle.
T4B= put next 2 purl sts onto cable needle and hold at back of work, knit next 2 sts from left hand needle, then purl 2 sts from cable needle.

                                       Competition winner: Photo by Jennifer Crandall.
                                                   '' The Worlds Softest Socks ''

Monday, February 21, 2011

competition winner

And the winner is: Darcys Knotty Knitter.
Darcy wins 3 skeins of Arctic musk ox blend in her color choice raspberry ripple. Congrats ! And thanks to all who took part.....the clear winner is the Egyptian red.
We would like everyone to know how we choose at random: as the comments come in we write the name down on a little post it note paper and slip it in a bag that we have hanging on the office notice board. The day after the competiton i get someone passing through ( business partner, kids, customer)to pick 1 out......so its fair for all who enter.
The next competiton is planned and will be posted soon.........Egytian Red SOCKS !

Friday, February 18, 2011

Buffalo/Bison Blanket

Another little treasure complete ! All knitters love that feeling you get when you have completed another project and you just know EVERY ST is PERFECT.....I know this blog is supposed to be about 'Qiviut' but Buffalo
 is another little Luxury i allow myself to indulge in.
100% Pure buffalo, Fully dehaired so the blanket is very soft and oh so cuddly ! Designed this one with natural buffalo and navy blue, has raised stitch design on some blocs and plain knit sts on others  and at this moment its on its way to its new owner in Arlington VA. ''I'm sure your gonna love it Liz''. Blanket measures 54'' X 75'' but has a 2'' inch border all around. The buffalo has a wonderful soft spongy feel to it. I tested it by wrapping it around my shoulders and you could feel the heat starting to generate within 60 seconds.
This blanket is $ 950.00 usd and includes xpress shipping.

Friday, January 21, 2011

Easy Knit Gloves

These are real easy to knit ! I used the 3 ply Arctic musk ox blend in Navy, Raspberry, hand painted teal and navy and a new hand painted color consisting of all the above colours, 4 colours in total and i may have enough yarn for 2 pairs !
Knit on 2.75mm D.P.N so the construction is firm and close fitting.

The only patterns i could find were vintage style calling for a total of 7 needles.....way to complex and annoying so i thought i would design an easy pattern using only 4 needles and holding sts not in use with waste lengths of yarn. Much simpler, easy to work and No Tangled needles to make you scream ! Follow the tension suggestion below and if you feel that you need them larger or smaller simply go up or down a needle size:
Tension on 2.75mm = 7 sts=1'' inch X 9 rows = 1'' inch
The picture above shows the thumb sts on waste yarn just before i close the gap.
***Remember when knitting in the RND (round)...Always put extra tension on your 1 st of every needle to prevent an ugly ladder/gap forming***.
I will add the pattern and more pictures as i go along, i hope to be able to show different segments in detail so you can easily knit these for yourself !
I would say the only sticky bit of this pattern is separating the sts and holding the sts not in use and writing the text in a clear easy to understand manner !
If this is your 1 st pair of gloves its probably better to knit them using a single colored yarn and trying the gloves for fit as you go along.

The Pattern:
You will need 75 grams -3 skeins of Arctic musk ox 3 ply yarn.

1 set of 2.75mm D.P.Needles.

3 lengths of waste yarn-worsted weight or small stich holders.

3 st markers.

ABBREVIATIONS- rnd=round. sts= stitches, sm=stitch marker,dpn=double pointed needles, sm=slip marker. Beg= beginning.

Make Cuff:
With 2.75mm dpn and your main colour cast on 44 sts, join to work in the rnd, pm knit 1 row.
Next rnd: k2, p2 for 6 rnds, then k 1 rnd.
 change to raspberry: k2, p2, 6 rnds Raspberry, k1 rnd.
Change to main colour, k2,p2 for 7 rnds, k1 rnd. Rib is complete.
With Navy k 5 rnds.
With main colour knit 6 rnds.

THUMB GUSSET:
Join on Raspberry and at the same time make thumb.
RND 1: k 18 sts, PM, m1, k1, m1,k1,PM, continue knitting rnd.
RND 2: and all Alternate rnds- knit without shaping.
RND 3: k 18, sm, m1, k3, m1, sm, k rem sts.
RND 5: k18, sm, m1, k5, m1, sm, k to beg.
Change to main colour: RND7:k18, sm, m1, k7, m1, sm, k to beg.
RND 9: k18,sm, m1, k9, m1, sm, k to beg.
RND 11: k18, sm, m1, k11, m1, sm, k to beg.
Change to navy and turquoise.
RND 13: k18, sm, m1, k13, m1, sm, k to beg.
Next Rnd: knit all sts to 1st marker, remove marker and put the next 13 sts for thumb onto waste yarn.
Next close the gap, knit putting EXTRA tension on the sts to close the gap. Palm Section:
Continue knitting around for another 5 rnds with navy and turquoise yarn.
As you can see from the picture above there is ample room to try the gloves on so you can get the best possible fit.
Change to hand painted yarn and knit another 6 rnds, again try the glove on for fit. After completing the next 6 rnds the work should reach the base of the beginning of your fingers.
Change to navy and knit 2 rnds.
, at same time inc 1 st each end of all 3 needles
Next make fingers:
With navy yarn, k across needle 1 and knit 8 sts onto needle 1 from needle 2. The rem 8 sts on needle 2, slip them onto needle 3 so you now have 48 sts on 2 needles that are parallel to each other.
 DO NOT BREAK YARN !
See below
Take 2 lengths of waste yarn and remove 18 sts from the end of 1 needle so you have 6 sts remaining, repeat for other needle. At this point i like to change to bamboo needles for the fingers, the bamboo is non-slippy so there is no chance of dropping sts when working in the rnd on a few sts!
With Thumb gusset facing to the right side begin to knit the index finger. k 4sts onto needle 1, 4sts each onto needles 2 and 3, put extra tension on the 1st of each needle so its nicely closed. Knit about 15 rnds and try on the glove, the knitting should come just over the tip of index finger.
Next: Break yarn leaving a 10cm tail, load wool needle and run through the 12 sts, close tightly and sew in loose end to inside of glove.
Change color for middle finger or not !
begin cast on  by leaving a 10cm tail (this is used to sew gap between fingers when glove is complete). Rep as for index finger, picking up a total of 12 sts and knitting this finger to same length as index finger. Rep for the ring finger too.
Pinkie-small finger: You should have 11 or 12 sts remaining (me, sometimes i have 12 and sometimes i have 11) ! You should have 12, if not, inc 1 st by picking up a loop between finger gap. Knit as for other fingers trying the glove as you go along and knitting till it reaches the top of your wee finger and close in the same way as other fingers.
Next: turn glove inside out and sew in all the loose ends by weaving them into same coloured rows.(i prefer a really sharp darning needle for this as it slips into the pearl sts neatly.

Thumb:
divide the 13 sts onto 3 needles and inc 1 st on needle 1. Knit as for fingers trying on as you go and finish in the same way sewing in the loose end.
Go make another glove !


Wednesday, January 19, 2011

January Competition: vote for your favourite colour

We LOVE Colour and want to know what is the most popular....Vote for your fav Arctic musk ox blend colour from the options above, left to right: hunter, slate blue, turkey red, purple, raven black, mahogany, raspberry ripple, Egytian red, Bordeaux, navy blue and Azalea.... Winner will be chosen at random and will receive enough yarn in your colour choice to make these EASY TO KNIT gloves.
This competeition runs to the 20th febuary 2011, open to knitters and Non-knitters world wide.

Saturday, January 1, 2011

Competition winner

And the winner is : Alison H.
With her entry ......Aulavik, Arctic Lichen, Sitka, McKinley, Taiga. Alison please contact us so we can ship you your prize......
Alison wins the skein of 'Artists Hand yarn' and the gorgeous soft lace scarf......congratulations petal !

Thanks to all who took part.

We have more Monthly competitions planned so Become a follower of our blog to see at a glance what were up to !
this months competition is already planned and will be published within a day or two.....so check back.....
'Happy Knitting New Year'

Friday, November 19, 2010

Artists Hand scarf...the giveaway

This is the lace scarf  knit from 'artists hand yarn' as part of our competition . Is knit from yarn number 1, measures 10'' X 52'' and is just so lightweight and soft, complete with a beaded slide that you can remove. Enter the competiton below for your chance to win this scarf and a 100 gram skein of this Gorgeous yarn !

Wednesday, November 10, 2010

yarn giveaway-win a skein of 'artists Hand' yarn

Here at cottage we are asking for yarn color name suggestions for our new 'artists hand' yarns 90% Qiviut- 10% Merino. To enter choose a name for each of the 5 yarns above, leave your suggestions in comments section and the person with the 5 best names wins ! To make it fair for everyone it will be my business partner who decides which entry wins
As this type of yarn is sooo special we would like the colour names to reflect the yarn content....think Qiviut - Musk Oxen - Tundra -Arctic Circle....flowers of the Tundra....check out Google and see what you can come up with !
Competition is open to everyone....world wide, closing date: December 31st 2010.What you win: 1 -100 gram skein of artists hand And a lace scarf 52'' X 10'' knit from 'artists hand yarn' the winner will be announced on this blog new years day( if i havent got a massive hangover...lol)...get your thinking cap on !

Wednesday, October 27, 2010

Shrug knit from musk ox yarn

A very simple way to construct a shrug is to knit the basic rectangle shape. this very versatile garment when knit from 100% qiviut or qiviut blends makes a wonderful back and shoulder warmer that's whisper light. You can easily knit your own shrug in any type of stitch design simply by knitting a rectangle shape.Measurements: S: 38'' X 20'' inches deep. M: 42'' X 22'' L: 46'' X 22'' XL: 50'' X 24'' The garment is knit length ways, casting on the sts for the left arm and knitting until you reach the right arm. To find your size, measure how long you want the sleeve to be X by 2 (for both sleeves) and then measure across the width of your shoulders/back or measure the width of your fav sweater. Once complete stitch the arm seams closed 2.5'' inches short of arm pit.......Voila

Wednesday, October 20, 2010

musk ox -fingerless gloves

''Going mad for teal''.....Knit from 100% musk ox yarn. I knit these with 2 strands of our lace weight yarn together on 3.75mm straights for the long cuff section & then changed to 3.75mm D.P.N for hand & finger section.....small project can be knit over the weekend. Added a sprinkling of beads as i'm a big bead fan !
I found this colour quite by accident. The gloves were supposed to be 'slate blue' but i added too much dye so i ended up with Teal.....loved the colour so much i had to get some teal nail polish & a gorgeous teal eyeliner. As i'm a big fan of Betsey Johnson i found a pair of froggy earrings in teal too. Teal is the colour this year.....even hollywood stars are mad about teal.....love it !

Monday, May 31, 2010

Arctic musk ox Blend cardigan Pattern.

Knit from our new Arctic Qiviut blend of 30% Qiviut- 20% Merino- 20% Silk- 30% Baby Alpaca- at $7.95 per 25 gram skein its a Luxurious little bargain. I knit this on a 3.5mm and used our 3 ply. I am pleasantly surprised with the results, the sweater is so soft warm and the fit is wonderful- close fitting and not too bulky in size XL.Perfect to wear with a thin t-shirt or a cute Cami-top. The colour is a natural sort of oatmeal. I don't usually go for this type of colour but this has a special sheen to it and the baby alpaca adds halo. I didn't want buttons for this so i opted for a single sterling silver clasp i bought from a silver dealer in Israel ....still hasn't arrived as yet ( i buy from Israel as much as possible to score Heaven points)

Old Shale Stitch or feather and fan pattern has been around since Victorian times.... makes for an easy knit stitch on the run. This pattern is so easy. Even if you have never knit a cardi before you can do this. The is similar to a short sleeved cardi  from http://www.flossyanddossy.blogspot.com/. Wendy, is a designer of everything Vintage and has Oh so cute wiggle
 dresses at a very reasonable price for her quality workmanship. flossy and Dossy also manufacture wedding dress at very reasonable prices. Check her out and grab yourself a little something special.

Tension: Over stocking st on 3.5mm needles -24sts X 27 Rows = 4'' inch square.
The overall measurements are: Length-back-24''. Width - 21''
Sleeves: length - 19'' - Width at top of sleeve -17''
Width at Front: 22'' includes the front bands/ribs. These measurements are approx; and are based on my knitting tension and the garment after blocking.

You will need :
1 pair of 3.00mm needles , 1 pair of 3.5mm needles, stitch markers, wool needle,
15- 25 gram balls of Arctic blend 3 ply by http://www.cottagecraftangora.com/
Clasp or buttons to close at collar.

The pattern:
With 3.5mm cast on 130 sts then follow this pattern throughout for the back.
1: (RS) Knit.
2: Purl side.
3: K2, * (PM)-place a marker, K2 tog ( 3 times), YO, K1 ( 6 times), K2tog (3 times).Rep from * to last 2 sts, k2.
4: Knit.
Repeat the above rows until work measures 15'' inches long ( no stretching). Next, change to regular stocking st on the next knit row, work until back measures 17'' inches long.
Under arm shaping: Cast of 5 sts at the beg of next 2 rows. then DEC 1 st each end of the next 4 rows. Work straight until armhole measures 9.5'' inches deep. Shape shoulders: cast off 6 sts at the beg of next 4 rows. then cast off all rem sts purl side.

Right Front:
Cast on 76 sts. Work as for back keeping pattern correct, shape armhole, cast of 5 sts on the beg of next knit row, then 1 st at the beg of next 4 rows. work until armhole measures 6'' inches then shape neck front by casting/binding off 15 sts.Next DEC 1 st at neck edge every other row until armhole measures 9.5'' inches. Next cast off 6 sts at shoulders edge every other row 2 times. cast/bind off remaining sts.
Left front:
Same as right, reverse shaping.

Sleeves:
With 3.5mm cast on 58 sts. Follow pattern as set and place markers between so you always know where your at. Work on the 58 sts for 6 pattern repeats, then inc 1 st each end, work another 2 full pattern rep then inc 1 st each end again. Continue to inc 1 sts each end every 2 full pattern repeats.(that's 4 rows = 1 pattern repeat). Continue as set until work measures 10' long(without stretching).
Next change to stocking st. continue to inc 1 st each end every 4 rows.When work measures 17'' long inc 1 st each end every 2 rows until 100 sts, cast/bind off purl wise.make another sleeve.

Next :lightly press and steam all edges using silk or wool setting on iron. Sew up all seams.

Front bands: With (RS)  facing you, 3.00mm needles pick up & knit 136 sts from right front and K 2, P2  for 6 rows, cast off in k and p sts. Repeat for other side. You may find that you want a wider band, simply knit more rows till you happy with the width of the band/rib !
Neck: with 3.00mm needles pick up and knit 130 sts, k2,p2 for 6 rows, then cast/bind off knit and purl wise.
Please let me know if there are any errors......have fun !


Monday, March 15, 2010

100% Qiviut cabled cardi- part 2:

Ok so i have started the Left Front and boy is it going fast working on 4.00mm's & only 73sts & 2 cables. I love doing cables so much that i can't put it down. The back of the sweater weighed a total of 95 grams so the fronts should take at least 10% more.....this means with all my odd ends of batches i should have enough to finish the cardigan. The left sleeve is now finished & i have started the right. I can't wait for it to be done so i can weigh the whole thing to know exactly how much yarn our new pattern will require ! At this stage i'm enjoying every st.........but what color should i dye this ? At the moment i'm into Black, Purple & Raspberry !
Coloring a Qiviut sweater is quite nerve wracking......i just know i'm going to be stressed all the time its in the pot even though i kind of know what i'm doing. The pieces of knitwear have to be dyed before stitching them together this allows the dye to get even coverage, the bands have to be knit after dyeing so we need to add enough yarn to the dye pot too, but what color ?

Thursday, February 11, 2010

Qiviut cabled hat & mitts


Hand Knit from 100% Qiviut, i knit theses with 3 strands of 2 ply together.....they are so soft, thick & warm. This set is sold but i can make more. The set above sells for $260.00usd Or knit them yourself....patterns on our site at www.http://www.cottagecraftangora.com/

Sunday, September 6, 2009

Qiviut-Merino sweater-construction

I couldnt resist.....i just had to get into the new bags of coloured qiviut.I sneaked out of the mill(i was supposed to be carding angora rabbit fibre) with an armful of yarn and just had to find a quiet place so i could decide what to make with this yarn.I have always wanted a qiviut sweater......but the natural brown-ish grey would never do.I love color.........armed with my copy of Sheila Mcgreggors ''Traditional Fair isle knitting'' i sifted through pages and pages of what appeared to be very complex fair isle designs......i don't have time for complex.......my knitting time for design is composed of  a few minutes here and there! I settled on this boxy design and thought i would incorporate about 6 different colours into the sweater and this sweater will be affordable and easy to knit while using max amount of colour.
I will post pics of the sweater construction at each stage........the actual end design is not yet determined......i will get the feel as the knitting moves along. The yarns used so far are: Natural qiviut brown for the (MC) with hunter green, purple, raspberry and slate blue.
Finished the sweater and was sold before i got a chance to take a picture. At a Trunk show a customer Purchased it 'right off my back'.......I was thankfull i had showerd that morning OMG !

Tuesday, August 18, 2009

Qiviut-silk hand warmers


I wanted to remake these for the longest time. Several years ago i made a pair of long hand warmers from 100% Angora and they were really well received so i thought i would re-write a pattern for them made from qivisilk.It's very nice to work with.....soft and slippy.Again,i am knitting them with 2 strands of qivisilk together......makes for quicker knitting. I started them on 4 D.P.N but changed to 3 needles to make the pattern go easier.I am still knitting the wrist section and i want to make them quite long.....maybe almost elbow length and i still haven't decided if i should make them all over lace right down to the fingers....you know....across the palms too! Or should i stop the lace at the section just before the thumb insert?

100% Qiviut cabled sweater- sweater construction-part 1:

Today i just had to start a new Cardi,this one will be a roomy XL size. Knit from 100% Natural qiviut. I'm writing the pattern as i go along for 6 sizes. The yarns are from 3 different batches of Qiviut-there's only a slight variation from batch to batch but never the less...the variation is there so i'm trying to work out what will go where.....its an awful lot of work to rip out if i get it wrong !The rib is a 2x2 & is knit on 3.00mm's for 2.5'' inches, changed to 4.00mm for the body. All the back section is knit in plain stocking stitch....all the business will be in the front with cables and lacey bits & 3 buttons to close. I'm having musk ox horns deliverd soon so they can be sent off to an artist who can make buttons (i want to keep the qiviut theme True so the buttons should be made from real Musk ox horn)....your probably thinking how the heck can she get musk ox horns ? Well i buy them from the Inuit. Musk oxen are food for them people(there's no Walmart where they live ! I really wanted to knit this cardi in Raven Black but because i have to work in the mill or studio during the day i can only hand knit in the evening......knitting black in the evening is not good for my eyes so i settled on making the sweater in natural qiviut & then i will dye the completed sweater....if i have the nerve...... after all that work ! Can't wait to start the fronts.....stocking st is soooooo Boring.
And the back is finished....... I like this pic better as it shows the true color of qiviut